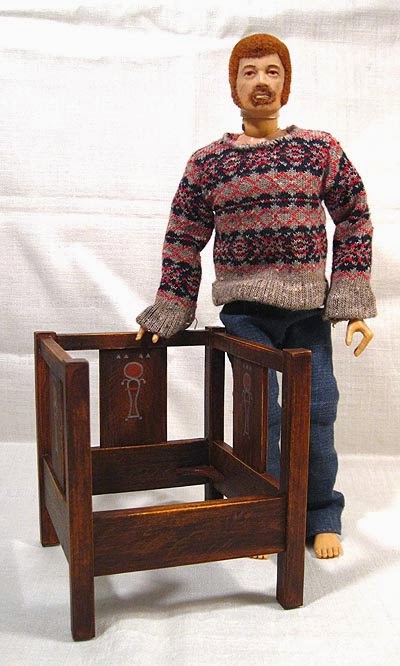
So Joe went antiquing last weekend and
look what he found. Score!
(He still doesn't have any shoes. Poor Joe.)
That's right, it's a Gustav Stickley cube chair, in pretty good condition. Well, actually it was designed by a guy named Harvey Ellis for Stickley's company, but close enough.
It's in quartersawn oak, and looks like it was darkened with ammonia fumes, a treatment that was all the rage at the time. It's a little worn here and there, true, but that's what they call 'patina' in the trade.
You can see that it's still got the little brackets that support the seat, although it didn't come with a cushion. Which is fine anyway as one may wish to custom make that to individually match one's décor. It also has little felt pads the last owner glued on the bottom of the legs so as to not scratch the floor. Very considerate!
Here are some closeups of the back and side splats, featuring the Art Deco-ish designs that do look rather Egyptian influenced:
Alas, it didn't come with whatever was originally used to support the cushion proper. But that's okay; Joe's already scared up an old hunk of plywood and cut it to fit:
He's a handy guy, Our Joe.
Without the cushion it's not very comfy, true, and it will certainly need a pillow in the back as well, as completely straight-backed chairs are never good on your lumbar region, but that's the problem with some Craftsman furniture. If I may quote Frank Lloyd Wright on the hazards of allowing form to override considerations of function:
"I have been black and blue in some spot, somewhere, almost all my life from too intimate contacts with my own furniture."
Oh well. We'll get Joe a pillow. Maybe one of those embroidered ones with the Glasgow roses; that would be nice.
***
So. I used pictures from the internet for reference, one set of which had measurements, which was
very nice. Also there are quite a few sites that have free plans for mission/craftsman furniture out there, including
this place whose plans include a good deal of explanation, which is helpful. Unfortunately those pages seem to have been taken down when the site was recently I think redesigned (link via the Wayback Machine).
Since I don't have a whole lot of experience working in wood, and since though I do have the tools I don't have anywhere to set things up right now, I made this chair out of layered mat board, which idea I totally cribbed from Kris at
One Inch Minis. 'Cause if there's one thing I've got, it's a freakin'
ton of mat board scraps. Years ago I worked part time at a frame shop for this guy, who, in the interests of both anonymity and accuracy of character we'll call 'Dick'; he really was overall a piece of work but he did let me have the bits cut out of the inside of the mats. Mostly I figured I'd be doing some art on them, even if some of them were small, as many of them were this nice off-white acid-free rag stuff. They sure are coming in handy now, so I guess Dick was of some use to this planet after all. I would never have guessed.
It was pretty clear to me that if this little chair was going to hang together and be relatively sturdy it was going to have to have proper joints and not just be glued with the butt-ends together, and using mat board made that relatively easy, because I could just cut the separate layers differently. Also I'm nowhere near good enough right now to cut real mortise and tenons in itty-bitty oak, and besides where am I going to find one eighth inch thick oak? Luckily most mat board is about a sixteenth of an inch thick; in the more usual world of one-twelfth scale miniatures that works out to a neat three-quarters of an inch, which is the usual standard thickness for commercial lumber (in the US, anyway). At one-sixth scale that means it gets doubled, but that's easy enough with a bit of glue.
It's painted with acrylics and I kind of surprised myself with how much it looks like oak. I may do a tutorial later on how to get that finish as it was surprisingly easy and looks freakin' fantastic, if anyone's interested.
So there's Joe's chair. He doesn't have a house yet, but it's a start!
Labels: craftsman chair, GIJoe, miniature Stickley furniture, one sixth scale, playscale miniatures


